


As you know my husband and I are working on our bathroom remodel ourselves. We’re doing most of the work with the exception of putting the tile on the wall and installing a shower enclosure, those were out of our comfort zone. We did the demolition and Kevin did all of the new plumbing and framings. The next project we tackled, after the tile was installed, was getting faux shiplap installed for the water closed and accent wall in the vanity area.
Kevin and I get along pretty well, but we argue like cats and dogs when it comes to construction. Kevin knew I wanted to put faux shiplap in the bathroom but to him, it didn’t make sense. He did a little research and found that the real thing was about the same cost as the DIY shiplap and working with 8-foot pieces of 6-inch pre-fabricated shiplap would be A LOT less work but I didn’t care, I wanted to use Faux Shiplap and that was that. With my victory in hand we went to the local hardware store and got 4×8 sheets of plywood, we asked someone in the store to cut them in half (they wouldn’t cut it in 6-inch pieces like I thought they would) and we used our trusty table saw to cut the rest of the pieces at home.
Since we purchasing our home we’ve been buying tools, which Kevin loves, and almost all of them are Ryobi tools. They work great and the prices are fantastic. For this project, we are more than happy that we partner with Ryobi, which sponsored our folding 10-inch Table saw. Without this tool, we wouldn’t have been able to cut the plywood at home and Kevin would have likely won the Faux vs authentic shiplap argument; thanks, Ryobi!
Si me sigues por un tiempo sabrás que mi esposo y yo estamos trabajando en la remodelación de baño nosotros mismos. Estamos haciendo la mayor parte del trabajo con la excepción de poner la baldosa en la pared y el piso y la instalación del vidrio que cierra la ducha, porque estos proyectos estaban fuera de nuestra zona de confort. Si me sigues de tiempo sabrás que mi esposo y yo hicimos la demolición del baño y Kevin instalar la plomería. El siguiente proyecto que tomamos después de que la baldosa fue instalada, fue lo que en ingles se llama faux shiplap, es como un enchapado de madera. Decidimos colocar este shiplap en el muro decorativo donde irá el vanity.
Kevin y yo nos llevamos bastante bien, pero discutimos como gatos y perros cuando se trata de construcción. Kevin sabía desde el comienzo que yo quería usar la técnica de faux shiplap en el baño pero para el usar esta técnica era una pérdida de tiempo y dinero, según él era mejor poner el material verdadero que es shiplap que son una tablas gruesas de madera. El hizo su investigación y según él resulta casi igual en precio poner real shiplap que faux shiplap, la verdad para mi lo importante era que si en algún momento me canso de enchapado, este será fácil de remover. Al final convencí a mi esposo de usar el faux shiplap.
Con mi victoria en mano fuimos a la tienda de materiales y compramos como 6 láminas de triplay de 4×8 pies, pedimos a alguien en la tienda que cortara el pedazo por la mitad por la mitad. He leído en muchos post que uno puede pedir que te lo corten en pedazos mas pequeños, pero a mi me dijeron que ellos solo lo podrían cortar en la mitad. Nosotros utilizamos nuestra sierra de mesa fiel para cortar el resto de las piezas en casa.
Desde que compramos nuestra casa se hizo muy necesario comprar herramientas, y a nosotros en particular nos encantan las herramientas de Ryobi, estas son fáciles de usar y los precios son muy buenos. Para este proyecto, estamos más que felices de que nos trabajamos con Ryobi, que patrocinó nuestra sierra de mesa plegable de 10 pulgadas. Sin esta herramienta, no hubiéramos sido capaces de cortar el triplay en casa y Kevin probablemente habría ganado el argumento de que el real shiplap es mejor que Faux shiplap. Gracias, Ryobi!


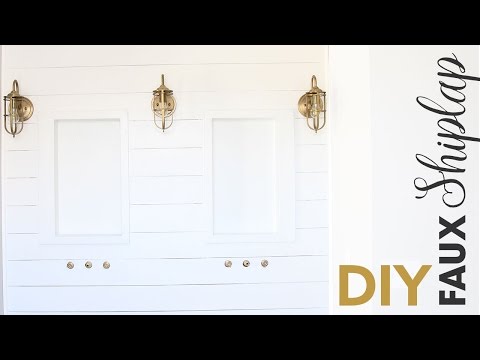
Kevin use the table saw to cut 6-inch strips of wood. I recommend making all of the cuts outside. If you cut indoors it’s going to make a lot of dust. After doing a lot of research I told Kevin that we were going to use nickels as a spacer for the faux shiplap, which he originally laughed at but in the end, he thought it worked out fairly well. He placed the boards in using his brad gun, spaced the boards with nickels, caulked the corners, and filled the nail holes with synthetic wood filler. To finish the look he used a decorative frame around the top giving a little more dimension to the new water closet. Once everything was dried we primed and painted the walls with Sherwin Williams primer and white semi-gloss paint.
Kevin uso la sierra de mesa para cortar tiras de madera de 6 pulgadas de ancho. Les recomiendo hacer todos los cortes afuera o en el garaje. Si cortas en dentro vas a llenar la casa de polvo. Después de hacer mi investigación le dije a Kevin que había visto como mucha gente usaba monedas (nickels) como espaciadores para colocar el faux shiplap, que al principio él pensó que era algo tonto, pero al final se dio cuenta que funciono de maravilla. Colocó las tablas en la pared usando su pistola de puntillas y colocó las moneditas como espaciadores. También selló toda las esquinas con masilla y yo cubrí todo los huecos dejados por las puntillas usando la masilla para madera. En la última línea de las tablas colocar un borde decorativo.
Una vez que todo se secó, preparamos y pintamos las paredes con Sherwin Williams y pintura blanca semi-gloss.


As for the accent wall, we followed the same playbook from top to bottom. The only thing we did differently on the accent wall was to start from the top instead of the bottom. I asked Kevin to start from the top because I wanted to be absolutely sure that the boards were full boards as far as you could see. Sadly due to the nature of gravity, it made placing the nickels as spaces in the boards impossible, at the end Kevin estimated the gaps he left between boards.
En cuanto a la pared de decorativa, seguimos la misma guía que lo que hicimos en el cuartito del inodoro. Lo único que hicimos de manera diferente esta pared fue comenzar desde la parte superior en vez de la parte inferior. Le pedí a Kevin que empezará desde arriba porque quería estar absolutamente segura de que la última tabla en la parte superior iba a estar completa. Lo que no me puse a pensar es que cuando uno comienza desde arriba uno no puede poner espaciadores (No pensé en la gravedad…jiji) Al final Kevin calculo es espacio que debía dejar entre tablas al ojo. Al final Kevin hizo un buen trabajo.

Kevin also made these beautiful Pottery Barn Inspired Medicine Cabinets.
Kevin también hizo es botiquines inspirados en Pottery Barn.


Kevin installed the gorgeous Feiss Urban Renewal Antique Brass Sconces that Lamps Plus sent to me. If you’ve followed me for a while, you’ll recognize this style. It’s the same style that I put in the downstairs guest bathroom; I love it. I’m so happy that this style is also available as single sconces lights. If you are looking for a light fixture the place to go is Lamps Plus I’m sure you are going to find what you are looking for, they have everything. These lights go perfectly with our color palette and are of simply amazing quality. Thank you so much to our friends at Lamps Plus for collaborating with us again, I love these fixtures!
Kevin instaló las hermosas luces Feiss Urban Renewal Antique Brass Sconce que Lamps Plus me envió. Si me han seguido durante un tiempo, reconocerás este estilo. Es el mismo estilo que puse en el baño de huéspedes del primer piso y me fascina. Estoy tan feliz de que este estilo también está disponible como luces individuales. Si estás buscando cualquier tipo de lámparas o luces para tu casa te recomiendo visitar la página de Lamps Plus estoy segura de que vas a encontrar lo que buscas, tienen todo. Estas luces van perfectamente con nuestra paleta de colores que estoy usando y son de calidad increíble. Muchas gracias a nuestros amigos en Lamps Plus por colaborar con nosotros de nuevo en un proyecto, me encantan estas luces.


We are happy with the overall look of our master bathroom. We love that it an expression of our own personal style and is a huge departure from the typical bathroom of a cookie cutter home. This project is taking more time that we were expecting but we are pretty new to this DIY construction thing and this is a big project. As you may know, Kevin is a software engineer and I’m working a lot on my Etsy shop and YouTube channel so we’re fairly busy as-is but with us both putting in work on the weekends it is coming along well, even if there are weekends where we just want to relax. 😉
So here we are, getting close to the end. The company doing our shower enclosure should be by to install it in about two weeks and I’m hoping that we will finish the DIY vanity soon. This is all for now, there is more to come, follow us as we continue our journey.
Estamos contentos el look que está tomando nuestro baño principal. Nos encanta que refleja nuestro propio estilo y que no se parece a nada a los baños típicos de las casa prefabricadas de los suburbios. Este proyecto está tomando más tiempo que esperábamos pero espero que entiendan que nosotros somos nuevos a este tipo de proyecto de construcción “hazlo tu mismo”. Kevin es un ingeniero de sistemas y yo trabajo en mi tienda Etsy y canal de Youtube y andamos bastante ocupados en la semana, asi que el único tiempo que tenemos para trabajar son los fines de semana. Y hay fines de semana en lo que lo único que queremos hacer es descansar.
Ya nos falta muy poco para terminar, estamos esperando que la compañía que hará en encerramiento de las parece venga. Y nos toca terminar de construir el vanity que va en mitad del camino. Eso es todo por ahora hay mucho mas por venir.


WATCH THE VIDEO TUTORIAL – ENGLISH VERSION
VE EL VIDEO – VERSION EN ESPAÑOL

PS While all of these opinions are my own and I stand by all the products mention here, Lamps Plus provided the gorgeous lamp fixture I used which completed the look for my master bathroom. Ryobi sponsored the table saw we used in this project. Thank you Lamps Plus and Ryobi for all your help.
PD. Todas estas opiniones en este post son mías y me encantan todos los productos que use, Lamps Plus me proporcionar la hermosa lámpara para completar el look de mi baño principal. Ryobi nos proporcionó la sierra de mesa que usamos para cortar las tablas de madera. Gracias a Lamps Plus y Ryobi por la ayuda.
If you want to check the different phases of the bathroom remodel click below.
Si desea puedes ver las diferentes fases de la remodelación de nuestro baño principal, haga click a los links de abajo.
Phase – Fase I – Demolition
Phase – Fase II – Instalations
Phase- Fase III – Faux Shiplap
Phase – Fase VI – Building an Industrial Vanity
Phase – Fase V – Painting the vanity with a RH finish
Phase – Fase VI – The Perfect Fixtures
Farmhouse Industrial Master Bathroom Reveal
I wanted to take the time to thank all of my sponsors. They have helped so much with the Master Bathroom Remodel. Thank you so much for being such amazing partners.
Quería tomar el tiempo para agradecer a todos mis patrocinadores. Me han ayudado mucho con el remodelado del baño. Muchas gracias por ser tan increíbles colaboradores

Delta Faucets |Lamps Plus | Ryobi| Build.com | Chalk Paint | Lowes.
